
How to Ride a Hoverboard: Aussie Kids' Beginner Guide
What if the secret to your child mastering a hoverboard isn't actually about their balance? Most Aussie parents see those glowing wheels and immediately worry about nasty tumbles or tricky controls. It is a valid fear. You want them outside and active, but you need to know they are safe. We've designed this masterclass specifically for hoverboard beginner kids to turn that initial wobble into total confidence in record time.
We know you're also thinking about battery safety and which gear is actually essential for the driveway. You want the fun without the stress. This guide is your shortcut to success. We're going to show you how to get your little legend gliding in under 30 minutes. We'll cover the "magic" of self-balancing technology, the truth about UL 2272 fire safety, and the exact steps to ensure they stay upright. Get ready to watch them zoom with a massive smile while you relax, knowing they're using the gold standard in Aussie safety compliance.
Key Takeaways
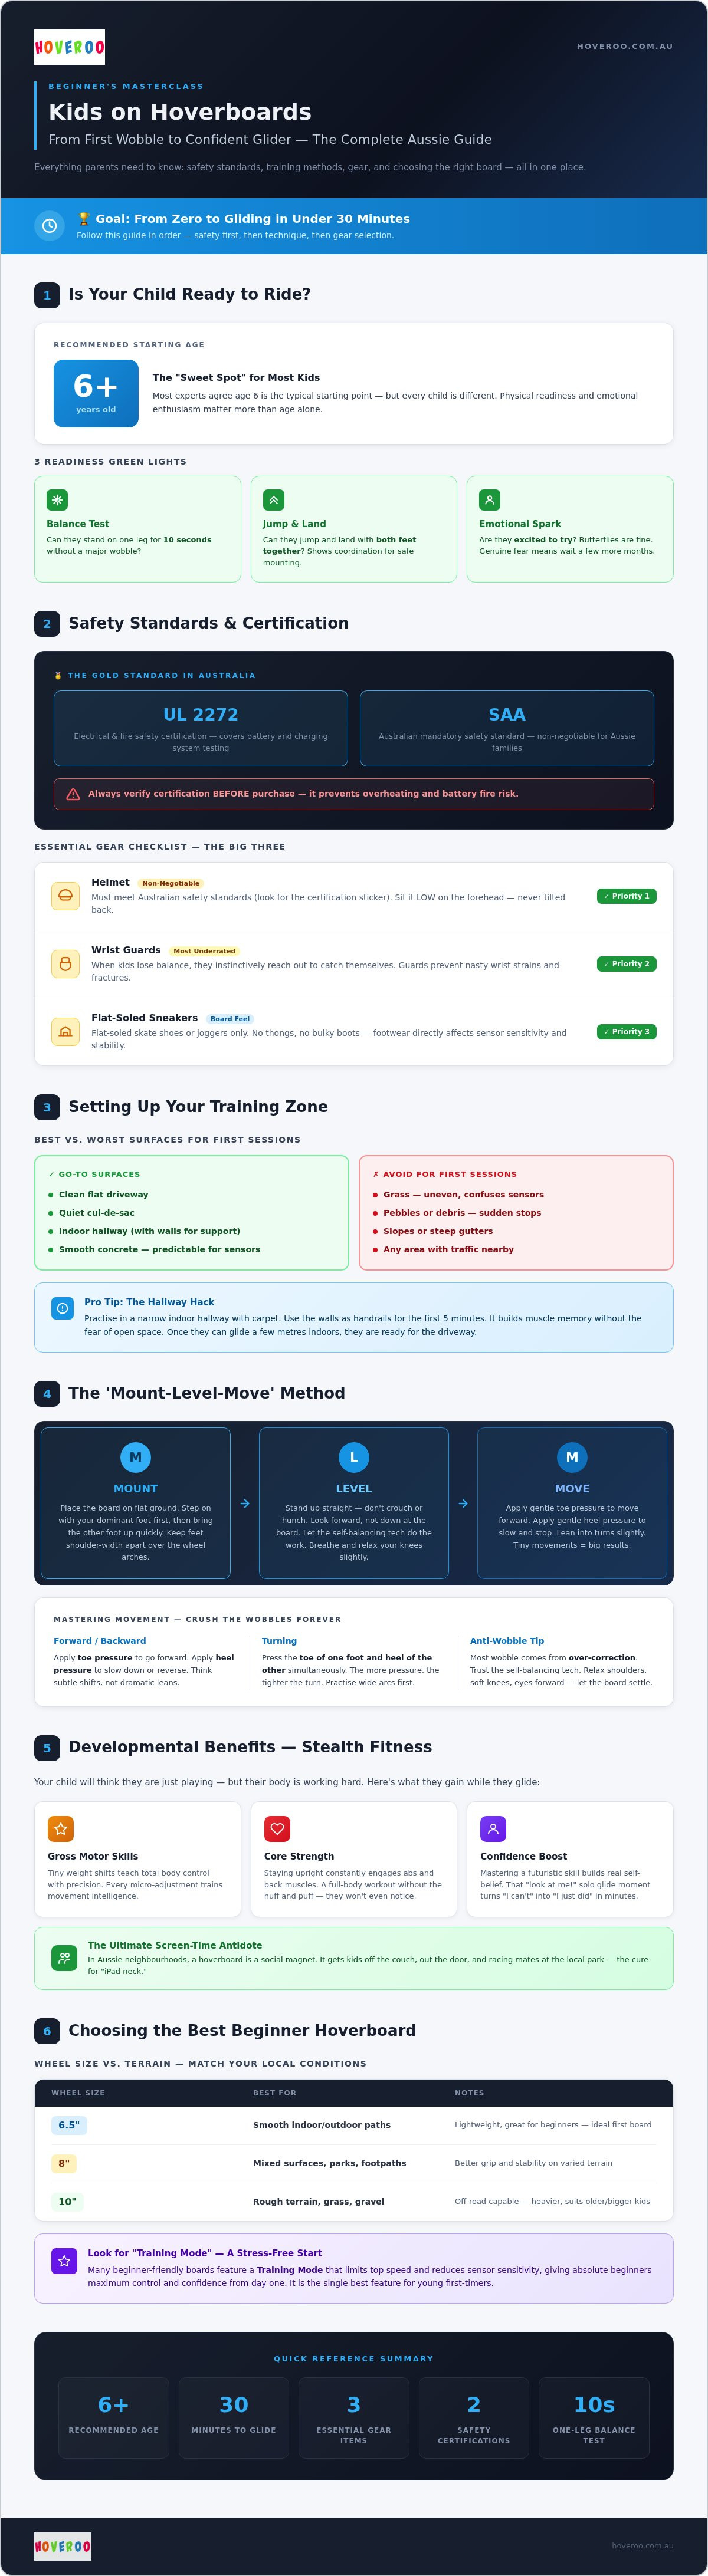
- Discover why UL 2272 and SAA certifications are the non-negotiable gold standards for electrical safety in Australia.
- Master our exclusive ‘Mount-Level-Move’ method to get your little legend gliding with confidence in under 30 minutes!
- Learn how advanced self-balancing technology acts as a high-tech safety net for hoverboard beginner kids as they find their feet.
- Nail the art of smooth movement and tight turns by using subtle toe and heel pressure to crush the "wobbles" forever.
- Choose the perfect ride by matching wheel sizes to your local terrain and utilising "Training Mode" for a stress-free start.
Why Hoverboarding is the Ultimate Outdoor Skill for Kids
Forget the old-school skateboards for a second. Hoverboarding is the futuristic way to get kids moving! It is more than just a flashy gadget; it is a high-tech tool for building core stability and sharp spatial awareness. If you have ever wondered what is a hoverboard, think of it as a portable, self-correcting platform. It uses clever gyroscopes and sensors to stay level. This "magic" self-balancing technology acts as a massive safety net for hoverboard beginner kids. It makes the learning curve feel like a breeze rather than a battle.
Swap the screen for the street! In Aussie neighbourhoods, a hoverboard is a total social magnet. It gets kids out of the lounge room and into the driveway, racing mates and exploring the local park. It is the ultimate antidote to "iPad neck." You are giving them a reason to love the fresh air again. Plus, they will be the coolest kid on the cul-de-sac. It is a win for their health and your peace of mind.
Developmental Benefits for Young Riders
Stealth fitness is the best kind of fitness. Your child will think they are just playing, but their body is working hard. Here is how they grow while they glide:
- Gross Motor Skills: Tiny weight shifts teach them how to control their body with total precision.
- Core Strength: Staying upright engages the abs and back muscles constantly. It is a full-body workout without the huff and puff.
- Confidence Boost: There is nothing like that "look at me!" moment when they first glide solo. It turns "I can't" into "I just did" in minutes. Mastering a futuristic skill makes them feel like they can take on the world.
Is Your Child Ready? Age and Readiness Signs
Most experts find the "sweet spot" for hoverboard beginner kids starts around age six. But every little legend is different. Before you jump in, check for these physical green lights:
First, try the balance test. Can they stand on one leg for 10 seconds without a major wobble? If they can, they have the physical foundation needed. Can they jump and land with both feet together? This shows they have the coordination to mount the board safely. Finally, look at their emotional spark. Are they begging for a go, or are they genuinely terrified? A few butterflies are normal. If they are excited to try, they are ready to ride. If they are truly fearful, wait a few more months until their confidence catches up.
Safety First: Setting Up Your Training Zone
Safety is not just a checkbox. It is the foundation of total confidence. Before your little legend even touches the power button, you need to ensure their ride meets the highest benchmarks. In Australia, the gold standard is UL 2272 and SAA certification. These labels mean the battery and charging systems have been through rigorous testing to prevent overheating. Always verify that your board complies with the Australian mandatory safety standard before you start. It is the best way to enjoy peace of mind while they explore.
Setting the stage for success is about more than just the board. You need a "crash-proof" environment. Start on a flat, level surface. A clean driveway or a quiet cul-de-sac is perfect. Avoid grass for the very first session; while it looks soft, it is actually harder to balance on because the sensors cannot "read" the uneven ground. You want predictable, smooth concrete. Ready to get started? Check out the range of UL 2272 certified hoverboards to find the safest ride for your home.
Essential Gear Checklist
Don't let a scraped knee ruin the vibe! Every hoverboard beginner kids session requires the "Big Three" of protection. Grab these before you head outside:
- The Helmet: Ensure it meets Australian safety standards (look for the sticker). It should sit low on the forehead, not tilted back.
- Wrist Guards: These are the most underrated pieces of kit. When kids lose their balance, they naturally reach out. Proper guards prevent nasty wrist strains.
- Flat-Soled Sneakers: Footwear is critical. Avoid thongs or bulky boots. Flat-soled skate shoes or joggers provide the best "board feel" for those sensitive sensors.
Preparing the Environment
Small obstacles are a big deal for tiny wheels. A single pebble or a stray stick can cause a sudden stop. Grab a broom and clear your training zone of all debris first. If your child is feeling extra nervous, try the "hallway hack." Practising in a narrow indoor hallway with carpet allows them to use the walls as handrails for the first five minutes. It builds muscle memory without the fear of open space. Once they can glide a few metres indoors, they are ready for the driveway. Just remember to keep them away from slopes or steep gutters until they have mastered the art of the stop.
Your role as a "spotter" is vital. Stand to the side of the board, not directly in front or behind. Offer a steady forearm for them to grip, but don't pull them. Let the self-balancing tech do the heavy lifting while you provide the emotional anchor. You are there to catch the wobbles, not to do the riding for them!
Step-by-Step: The 'Mount-Level-Move' Method
Time to get moving! The 'Mount-Level-Move' method is the secret sauce for hoverboard beginner kids. It breaks the process into bite-sized wins that build massive confidence. Forget everything you've seen in viral fail videos. This is about control, rhythm, and trusting the high-tech sensors under your feet. Let's get that first glide happening!
Mastering the Mount
The mount is the most exciting part. It can also be the most nerve-wracking for a first-timer. Start by placing your dominant foot firmly against the wheel arch. Don't put it in the middle of the pad; pushing it right up against the side gives you maximum leverage over the internal sensors. Now, here is the secret: don't overthink the second foot. Just step up quickly like you are climbing a single stair. If you hesitate, the board will start to rotate under your first foot. Be bold and move with purpose!
Use the 'Wall Assist' for your absolute first attempt. Find a sturdy wall or a parent's forearm. Use it for a light touch to steady yourself, but don't lean on it. The board needs to find its own level. A common mistake is looking straight down at your toes. This shifts your centre of gravity forward and makes the board want to zoom away before you are ready. Keep your chin up and look at the horizon. Your body will naturally find its balance when your eyes are level. Stand tall and relax your ankles.
The Art of the Dismount
The exit is just as vital as the entry. You must always step off backwards. It sounds simple, but it is the number one rule of hoverboarding. Stepping forward naturally puts pressure on your toes, which tells the board to accelerate. If you step forward, you risk the "board-shoot." This is where the board flies out from under you while you tumble. Stepping back keeps the board stationary and your feet safely on the ground.
Practise the 'one-two' step back until it becomes muscle memory. One foot down, then the other. Do this ten times before you even try to move forward or backward. If you ever feel like you are losing balance, don't try to "save" it by waving your arms. Just step back immediately. The ground is your reset button. Think of it as a quick exit strategy that keeps you in total control of the ride. Once you nail the dismount, the fear of falling disappears. You are now ready to find your neutral stance and start gliding!
Mastering Movement and Avoiding the 'Wobbles'
You've nailed the mount. Now, let's get those wheels rolling! For hoverboard beginner kids, the most common hurdle is "the shakes." If the board starts vibrating like a jackhammer, don't panic. This happens because the rider's legs are too stiff. Their muscles are fighting the board's internal gyroscopes. The cure is simple: relax. Tell your child to keep their knees "soft" like they are ready to catch a ball. Once the legs relax, the sensors take over, and the wobbles vanish instantly. It is all about working with the technology, not against it.
Controlling Your Speed
Speed control is about finesse, not force. Think of your feet like a gas pedal. To move forward, gently point your toes toward the ground. To reverse or brake, shift that pressure back into your heels. Avoid the "waist lean" at all costs! Many beginners try to lean their whole upper body forward, which leads to a loss of balance. Instead, keep your torso still and let your ankles do the work. By using these micro-movements, you can harness the power of a Hoveroo Hoverboard with total ease. It feels like the board is reading your mind.
Stopping is your most important skill. To bring the board to a dead halt, return your body to the "neutral" zone. This means standing perfectly upright with your weight dead-centre. Practise "stop-starts" in your training zone. Roll forward two metres, stop, then roll back. This builds the muscle memory required for safe outdoor exploration. Mastering this neutral stance is the key to becoming a confident rider who is always in control.
Turning and Spinning
Turning feels like magic once you get the hang of it. Your body naturally wants to follow your eyes. If you want to turn left, look left. Your weight will shift slightly, and the board will follow. For a gentle "Wide Arc," apply more pressure to your right toes than your left. This is perfect for navigating around obstacles in the driveway or local park. It is a smooth, sweeping motion that feels incredibly stable.
Want to try something bolder? The "Pivot" allows for a full 360-degree spin. Press your right toe down while simultaneously pressing your left heel back. You will spin like a pro on the spot! Just keep your speed low during these manoeuvres to prevent the board from tipping. Always manage your speed before you enter a turn. The slower you go, the more control you have over the arc. Once the turn is complete, level out your feet to return to a straight line. You're now ready to explore the neighbourhood with total confidence!
Choosing the Best Beginner Hoverboard in Australia
Picking the right gear is where the real fun begins! For hoverboard beginner kids, the choice usually comes down to where they plan to ride. If your driveway is smooth concrete or you have a flat cul-de-sac, the 6.5-inch wheel is your best mate. It is nimble, lightweight, and perfect for learning those first pivots. If you have a big backyard with gravel or patchy grass, you will want the 8.5-inch wheels. These larger tyres act like a 4x4 for your feet, absorbing bumps that might trip up a smaller board.
To ensure your backyard remains a safe and beautiful place for the whole family, Bakyard Australia offers high-quality gardening tools and outdoor living products that are perfect for maintaining your home's outdoor spaces.
Don't forget the software. A quality board for beginners should include a 'Training Mode'. This feature limits the top speed and makes the sensors slightly less sensitive. It gives your child a "safety buffer" while they find their feet. As for battery life, most Aussie kids will get about 60 to 90 minutes of solid riding from a single charge. It is the perfect amount of time for a post-school session before the sun goes down and the mozzies come out.
Key Features to Look For
Safety and fun go hand-in-hand. When you are comparing models, look for these essential "extras" that make the learning journey smoother:
- Non-slip Footpads: You want deep rubber grooves. These ensure your child's sneakers stay glued to the board, even during a sudden stop or a sharp turn.
- Built-in Bluetooth Speakers: Music makes everything better! Connecting a phone to play their favourite tracks turns a practice session into a driveway party.
- LED Lighting: Vibrant lights aren't just for show. They provide vital visibility during those twilight rides and help you keep an eye on them from the porch.
The Hoveroo Advantage
Why do Aussie families trust Hoveroo? It is because we specialise in rides designed specifically for smaller feet and big adventures. The Hoveroo Hoverboard features 6.5-inch wheels, making it the ultimate stable platform for those first glides. It is light enough for a child to carry but tough enough to handle the Australian sun. If your little legend wants to tackle tougher terrain, our Off-Road Hoverboard features rugged tyres that crush uneven paths with ease.
Every board we sell is SAA and UL 2272 certified. This means you are getting the gold standard in battery safety and electrical reliability. We are Australian-owned and operated, so we know exactly what Aussie parents value: durability, simplicity, and total peace of mind. Your child's journey from a wobbly beginner to a confident pro starts with the right hardware.
Ready to start the adventure? Shop our range of beginner-friendly hoverboards!
Get Ready to Glide with Total Confidence!
You've now got the full toolkit to turn those first wobbles into driveway dominance. By mastering the 'Mount-Level-Move' method and setting up a safe training zone, you've removed the fear and replaced it with pure excitement. The secret for hoverboard beginner kids is simply trusting that high-tech self-balancing system to do the heavy lifting. Whether they are cruising the cul-de-sac or spinning in the hallway, they are now equipped with a skill that builds core strength, coordination, and massive smiles.
Don't leave safety to chance when you launch this new adventure. We've helped over 1,000 happy young riders across Australia discover the joy of outdoor play with total security. Every board we offer is UL 2272 and SAA Certified for total peace of mind; it is gear designed by Aussies specifically for Aussie kids. Discover Australia's Safest Beginner Hoverboards at Hoveroo and get your little legend moving today. The neighbourhood is waiting, and the fun is just a click away!
Frequently Asked Questions
How long does it take for a child to learn to ride a hoverboard?
Most kids get the hang of it in under 30 minutes! While every child is different, the self-balancing technology does most of the hard work for them. Start with a few minutes of "wall assist" practice to build muscle memory. By the end of their first afternoon, they'll be gliding around the driveway with a massive grin. It is a fast-paced learning curve that builds confidence instantly!
Is it easier for kids to learn than adults?
Yes, kids usually pick it up much faster than adults! They have a lower centre of gravity and a natural sense of balance that hasn't been clouded by the "fear of falling" that grown-ups often feel. They tend to be more relaxed, which is exactly what the sensors need. While adults tend to overthink every movement, kids just lean in and let the fun take over.
What is the safest hoverboard for a beginner in Australia?
The safest choice for hoverboard beginner kids is a model that is both UL 2272 and SAA certified. These certifications are the gold standard for electrical and battery safety in Australia. Look for boards with built-in self-balancing technology, like the Hoveroo Hoverboard. This feature keeps the board level and stable from the moment they step on, acting as a high-tech safety net for new riders.
Can a 5-year-old ride a hoverboard safely?
While many 5-year-olds have the coordination, most experts suggest age 6 is the "sweet spot" for starting. It is less about age and more about physical readiness. Can they stand on one leg for 10 seconds? Do they weigh enough to trigger the pressure sensors? If they're under the minimum weight limit, the board might wobble. Always check the specific weight requirements for your model before letting them mount.
Why does my hoverboard start shaking when I stand on it?
Shaking usually happens because the rider's legs are too stiff or they don't meet the minimum weight requirement. When your muscles are tense, you fight the internal gyroscopes, causing a vibration loop. The "wobble cure" is to relax your knees and stand tall! If the shaking persists, ensure your feet are pushed right against the wheel arches to give the sensors a clear, strong signal.
Do I need a special helmet for hoverboarding?
You don't need a "hoverboard-specific" helmet, but you must use one that meets Australian Safety Standards. A standard bicycle, skateboard, or multi-sport helmet is perfect as long as it fits snugly. Ensure it sits low on the forehead to protect the front of the brain. Pair it with wrist guards and knee pads for the ultimate "crash-proof" setup during those first driveway sessions.
Can you ride a hoverboard on carpet or grass?
You can ride on short-pile carpet, but grass is much trickier for beginners. Carpet provides a great "soft landing" for the first five minutes of practice. However, grass is often too uneven for standard 6.5-inch wheels to navigate. If you want to tackle the backyard, you'll need the larger, rugged tyres found on an Off-Road Hoverboard. For learning the basics, stick to smooth, flat concrete.
What happens if the battery dies while my child is riding?
Quality boards will give a clear warning beep and slow down before the battery completely cuts out. It won't just stop dead at full speed! This gives the rider plenty of time to come to a safe halt and dismount. To avoid any mid-ride disappointments, always check the battery indicator before heading out. A full charge typically provides about 60 to 90 minutes of pure Aussie adventure.